Latest
Bass DIY: How To Set Up A Bass Guitar
In This Issue, We Cover Just How To Set Up A Bass Guitar…
How To Set Up A Bass Guitar, by Guest Contributor Lee Atterton.
If you’re a bass player, you know that having a guitar set up to your specific playing style is essential to performing your best. But if you’ve never done it before, the thought of setting up your own guitar can be daunting. Where do you start?
With a few tips and tricks from my article, you can save yourself money by setting up and repairing your own instrument. And you can also make a few bucks doing odd jobs for your friends.
I started playing guitar when I was a teenager, and it quickly became my passion. I taught myself how to play, and I also taught myself how to set up and maintain my instruments. This was purely out of necessity; I couldn’t afford to pay someone else to do it for me.
Over the last 25 years, I have developed enough knowledge about guitar setup, and I’m now going to share that knowledge with you.
This guide to bass setup provides the basic knowledge required to set up your bass guitar to your own specifications.
As a bass player, it is important to have a working knowledge of the major components of your bass guitar.
Read through each section carefully, and understand the principles and techniques involved before starting work on your guitar.
My first piece of advice would be to get hold of an old bass and practice your techniques before applying your skills to your ‘working’ guitar!
Ok, let’s get into it…..
“The art of correct bass guitar adjustment lies in one’s ability to be able to appraise the various factors that constitute the playability of an instrument”
Work Area
Do you have a ready-made workshop? Nope? Neither do I. We will need to do our best with what we have. The good news is that setting your bass up requires minimal space.
Basic Requirements Are:
- Find a dry and clean environment to work in. Around 4ft x 2ft and a comfortable working height. A high chair or simply standing is the best practice.
- You’ll need a power supply nearby. Kitchen worktops are the perfect height for standing up, plus you’ll also be in reach the mains outlet. This is generally the best place to work.
- Last resort, you can always use your kitchen table, but you may be much lower and need to sit.
Equipment Basics
When placing your guitar on a worktop, it needs to be supported under the neck, directly underneath the nut. Also, lay a clean towel underneath the body. Avoid any scratches to the body.
This neck support removes pressure from that area and places the guitar at a secure angle. Do not work on a bass guitar if it’s flat.
A support can be made from a piece of wood in the shape of a half-moon with some soft protective cushioning; felt or similar material is best and prevents the guitar’s neck finish from getting damaged.
Tool Requirements
Make sure you’ve got all the specific tools you need before you begin to tamper with any hardware. Things can get really frustrating if you haven’t got everything to hand.

Below is a list of tools you can start out with. You will undoubtedly add other suitable tools and gadgets as you become more proficient.
Tool list (basic minimum)
- Smooth Flat Singlecut Mill-File
- Set of Files (Needle Files)
- Stanley Knife blades
- Large & Small X head screwdrivers
- 1/4 of an inch & 1/8 of an inch-Flat Blade Screwdrivers
- Adjustable Spanner
- 1100-1200 grade Wet or Dry Sandpaper
- 360-grade silicon carbide paper
- 000 grade Wire Wool
- Set of Allen keys to fit the locknut (if fitted)
- Tube of Super Glue
- Junior Hacksaw blade
- A small Steel Rule, graduated in 32s & 64ths of an inch
- Small Pin Hammer
- Truss rod adjustment key that fits your bass model
- A Smooth File / Gentlemen’s Hacksaw
Soldering
- 35-watt Soldering Iron
- Resin Core solder and desoldering braid
- Wire Cutters
- Wire Strippers
- Screened and Single Core cable
- A small Multimeter Circuit Tester
Assessment Procedure: The 11 Steps
Follow the sections in order. The numbered bullet points are explained in detail under the How To Set Up A Bass Guitar in 11 Steps section.
- Tune to pitch A=440 (440hz). Check the condition of the strings.
- Check the height of the action at fret 12.
- Check the access relief with a visual check from around the headstock down to the neck of the body. Pressing the 1st string at the 1st and the last fret simultaneously. Measure the relief at the 7th fret. (Ensure your pickups are lowered at this time)
- Truss rod adjustment if required and re-tune.
- Measure nut height at the first fret.
- Set action height and re-tune.
- Adjust the truss rod – again, re-tune.
- Test by playing – play chromatic scale along each string to identify areas that sound at fault. Identify these areas with a small cross on the side of the frets using a soft pencil.
- Fret dress if required.
- Intonation check.
- Adjust pickup height.

How To Set Up A Bass Guitar in 11 Steps
1- Tuning/Strings
The strings on your machine are one of the most important parts. Check the condition of your strings before every use. If they are damaged or worn, replace them with your usual gauges. Ensure that the strings are fixed to the machine head posts securely to prevent slippage and tune to pitch. This will help keep your machine in good condition and sounding its best.
2- Action Height:
Measure the action height at the 1st and 6th strings (at the 12th fret). Use a rule with 64ths of an inch increments.

Take a measurement from the top of the fret to the underside of the string.
Basses with bridge saddles can be adjusted individually for height and will need to be measured one at a time.
Typical string gauge and action heights for various bass styles are 5/64″ up to about 7/64″… this comes down to personal preference, skill, and style. Remember, the higher gauge strings you choose, the thicker and lower tones will be.
Here are some pointers for string gauge:
- Rock and Blues
Typical string gauges 0.045 and 0.105 inches thick.
Players with a heavier technique may wish to try thicker strings.
- Funk/Slap
Stick with stainless steel strings for popping and slapping. Again, medium size seems to be the favorite.
Flea uses 45-65-85-105.
- Metal
You are going to need power with heavy metal. It’s the number one driving force behind a Metal band. Try steel bass strings.
If you’re thinking of using a plectrum, go heavier, but in general, 50-105 should suffice your urge to break eardrums.
- Acoustic Bass
Depending on how deep you want your sound, players are advised to use strings 045, .065, .080, .100
3- Neck Relief
Neck relief is necessary for a guitar’s strings to resonate properly and create sound. Relief assessment can be measured in the following ways:
- Look down the neck from the headstock, along the line of the E and G strings. You may see a slight ‘bowing’ of the neck. This is absolutely fine. You should see a bow on each side. Hollow reliefs and crowns are decoratively worn on the bass strings. However, one will appear concave while another is convex.

- Take a measurement from where the neck meets the body. Then take a look between the top of the fret to the bottom of the string. This should be, on average, about 4/32nds of an inch.

4- Truss Rod
The truss rod is a vital component of any stringed instrument. It is important to know how to adjust it properly.
The truss rod is responsible for counteracting the tension of the strings, and it can be adjusted to change the amount of relief in the neck.
Relief is the amount of space between the strings and the fretboard, and it should be set within a specific range to prevent buzzing.
If the relief is too great, the strings will buzz against the frets when played; if the relief is too small, the strings will be difficult to press down.
As a result, it is important to check the relief periodically and adjust the truss rod.
Carefully turn the truss rod nut in a clockwise direction. The neck will then take on a convex relief; counterclockwise produces a hollow or concave relief.
Remember: Never adjust a truss rod more than two complete 360 turns.
Make tiny adjustments with the Bass tuned to standard pitch.
My advice would be to adjust in quarter turns, then check, repeat.
As a general rule of thumb, if you need more relief at the 7th fret, you should slacken the truss rod slightly.
On the other hand, if you need less relief, you should tighten the rod slightly. Of course, every bass guitar is different, so you may need to experiment to find the perfect setting.
However, these tiny adjustments can make a big difference in the playability of your instrument. So don’t be afraid to experiment until you find the perfect setting for your guitar.

5- Fingerboard nut
Nut height is measured at the 1st fret in 64ths of an inch.
E & A Strings 3/64ths or lower – D & G strings 2/64ths or lower.
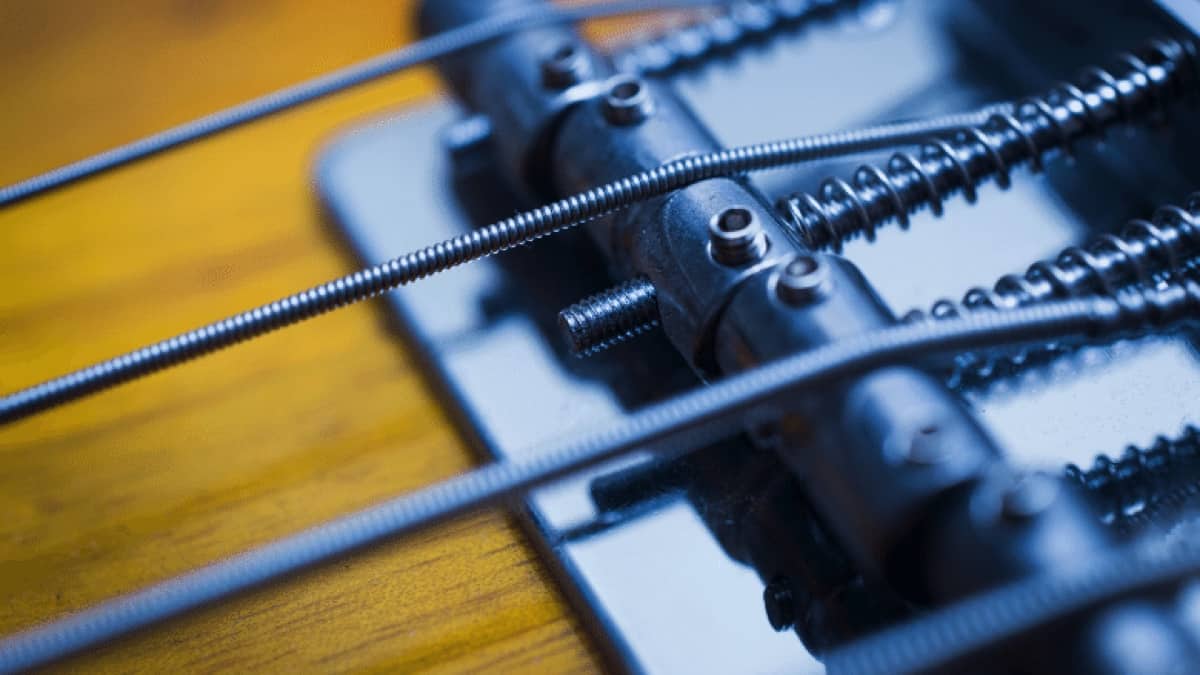
6- Bridge height
Luckily most modern-day bass guitars give you the facility for overall and individual bridge height modification.
Acoustic Bass guitars require adjustment to the saddle. You would need to shave off excess material, which lowers the action. Alternatively, you can use a process called ‘shimming,’ which raises the action if too low.
A helpful video on Shimming:
7- Final Truss Rod Prep and Action Check
Check the neck relief again to ensure all looks good. If required, make further minor truss rod adjustments, followed by final action height adjustment and re-tune to pitch.
8- Playing Test
Play a chromatic scale on each string to test for buzzes or dead notes. Start from the nut to the last fret.
It’s best practice to make a small mark with a water-based pen or pencil to know where your issues lie.
If the strings buzz and stop playing towards the top end of the fingerboard at the required action height, the frets may require removing to shave excess material.
9- Fret Dressing
I’ve made myself a single-cut ‘Mill File.’ The file has been cut and is attached to a block of wood. It’s pretty easy and a useful tool that you may want to consider making yourself.

Now for the Fret dress
Unwind the string tension and secure them away from the fretboard.
Another homemade tool you can make to assist you is the string retainer. It’s really easy to produce. It’s in the shape of an ‘M,’ from stiff plastic covered wire. All you have to do is bend it into shape. It keeps the strings away, so you won’t need to unwind them off the pegs.
Use a small file to lightly dress the frets you’ve previously marked. Ensure your frets are straight with a steel rule. Any rocking would mean a fret is too high and needs dressing. You can tell where the high spot is as the steel rule will knock slightly and rock up and down.
Attach the strings back and tune-up. Once again, run through a chromatic scale test. Mark any high spots and repeat the process until the fret buzz has completely gone.
Re-profile the frets with a small file gently. Then sand the frets lightly with 320 gauge silicon carbide paper. Ensure you wrap the paper around a rubber backing block or a cork sanding block, not a solid block that will damage the fretboard!
Finish with 1100 – 1200 grit sanding paper. Finally, use 000-grade wire wool to shine up those frets. Brush dust away with a small paintbrush.
Once again, tune-up and check all areas of the fretboard.
10- Intonation Instructions
Electric Bass Guitars
The bridge and saddles enable you to achieve an equal tempered tuning throughout the fretboard, thus giving you perfect tuning.
Use harmonics to assist you in your tuning and to gather if the length of your bass strings is correct.
Simply play a harmonic note at the 12th fret and use a tuner to see whether the note is perfectly in tune. Do it for each string.
If the harmonic note is sharp in relation to the tuner, the guitar’s saddle would need to be moved backward, increasing the string length – therefore flattening the note.
If the harmonic note is flat in relation. The saddle must be moved forwards.
A simple tip to keep in mind is sharp-backward, flat-forwards.
Acoustic Bass
‘Feathering’ the saddle can be used to make minor intonation adjustments. The same applies to the flat and sharp notes. Feathering in the direction of the issue. If you discover more severe tuning and intonation issues, you may need to reposition the bridge slot.
11- Pickup Height
The correct height for the pickups compromises obtaining the best possible signal strength from the strings. While not incurring any nasty tones caused by the pickup magnets being too close or too far from the strings.
The pickups should be set by holding strings down at the last fret. The measurements can then be taken from the top and bottom E strings to the top of the pole pieces. See your bass model setup guide to obtain ideal intonation.
Bass guitars, in general, are a quarter inch on the bottom E and approximately 1/8th of an inch on the G.
Final Thoughts
Musicians worldwide seem to think a bass is better once it’s been ‘played in.’ This statement has some fundamental truths, and a bass sometimes needs to settle in. Yet you can buy a brand new instrument, and if you set it up correctly, you can get a near-perfect guitar action.
A brand new guitar needs to be set up within the first three months of purchase.
I do not believe in vintage guitars ‘playing’ better than new ones. This statement is generally untrue. You can certainly find a newer model that has been set up professionally and sounds just as great as a worn-in vintage model. It’s all down to the player’s perception and preference, really.
Just as bass players’ skills vary, so do basses. Fit your bass around your style and hand size. You wouldn’t find Bootsy Collins playing a heavy metal bass. Ultimately a metal bassist may be lost with a set of light strings.
Bass setup is a finely tuned balance between the instrument’s suitability and your playing style.
These are components that only you, the player, can discover, as we all have different needs. Setting up your own instrument actually makes you a better player.
Consider the limitations of the bass model you’ve chosen and what you can and cannot accomplish by altering it.
It is essential to develop your own skills and feel to determine which modifications are necessary.
The skills are easy to learn but take time and practice to master.
Good luck,
Let me know how it goes ~ Lee
ABOUT LEE

Lee has been playing guitar for over 25 years. In the 1990s he made a few TV appearances in London and supported a few big bands at festivals. He’s recently sung on radio and worked as a full-time guitarist/singer on a holiday resort. Lee is the founder of Authority Guitar, a site where he wants readers to enjoy every aspect of learning the guitar.


Check out our top 10 favorite basses on Instagram this week…
Click to follow Bass Musician on Instagram @bassmusicianmag
FEATURED @cream.guitars @vosguitars @bite.guitars @wojtekpilichowski @pensacustomguitars @rikkersguitars @deoliveira_bass @overloadguitars @daniel_furian_luthier @bassworx_bab
Check out our top 10 favorite basses on Instagram this week…
Click to follow Bass Musician on Instagram @bassmusicianmag
FEATURED @pensacustomguitars @foderaguitars @dingwallguitars @mubcustom @thebassshop @hotwirebass @martyobrien @dacruzluthieria @baumguitars @luthier.aquilina
Check out our top 10 favorite basses on Instagram this week…
Click to follow Bass Musician on Instagram @bassmusicianmag
FEATURED @warwickbassesofficial @walbasscollective @fidelityguitars @bass.buddha @rayriendeau @paullairat @marusyaguitars @stevemcdbasses @michaeltobiasdesign @alesvychodilbasses
Check out our top 10 favorite basses on Instagram this week…
Click to follow Bass Musician on Instagram @bassmusicianmag
FEATURED @pensacustomguitars @niklas_lukassen @malinoskiguitar @custom_painter @belforti.instruments @mubcustom @sebastiengavetguitars @carl_thompson_guitars @marleaux_bassguitars @wilcockbasses
Check out our top 10 favorite basses on Instagram this week…
Click to follow Bass Musician on Instagram @bassmusicianmag
FEATURED @hiltonguitars @olintobass @vortice.custom.guitars @cb_basses @belforti.instruments @acguitars.co.uk @basscentralofficial @michaeltobiasdesign @timsway1 @officialspector