Bass Edu
Fretless Bass Intonation: Getting It Right!
Fretless Bass Intonation: Getting It Right!
Let’s talk about fretless bass intonation… Fretless bass is a great tool to have in your bass player arsenal. But adding fretless bass implies learning a different set of skills. Of all challenges that arise from playing fretless bass, we can identify one as definitely the biggest: intonation! It’s by far the single most important thing when playing fretless and the most important thing when playing bass at all. Playing it in tune!
Today we’ll share with you actionable techniques you can use in your practice routine to help you get that intonation in place.
But before we move on to the actual techniques and tips, let’s first get one very big thing out of the way.
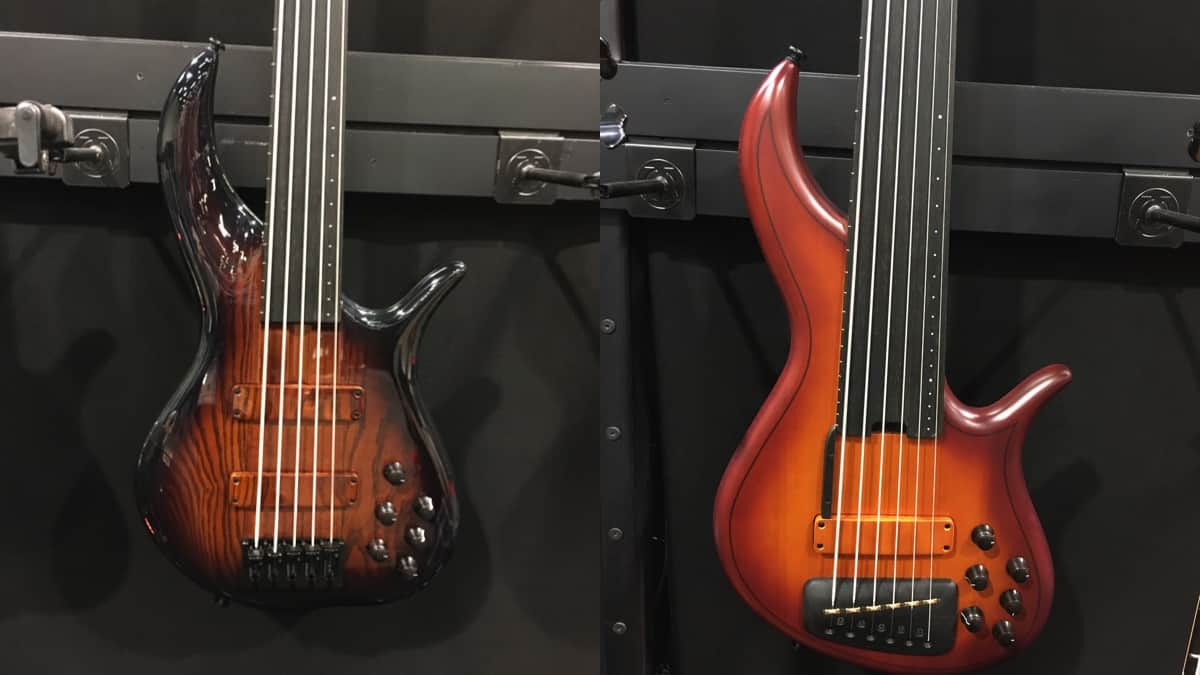
Lined vs Unlined
The ever-present question. Intonation issues are naturally less when playing a lined fretless bass because of the visual cues. That being said, don’t let that influence you. Go with what you like best, what makes you feel more comfortable and creative. Just be aware that unlined fretless will have a steeper learning curve.
Also, practicing in a dark room (as a lot of people will suggest) is not something I look forward to doing, but once again, go with makes you feel better.
With that out of the way let’s actually dive into what we came here for, intonation practice techniques.
1 – Practice intonation by using open strings.
First of all, make sure your bass is in tune!
Intonate with open strings is probably the oldest and most useful trick in the book. Imagine you’re playing the E on the 7th fret of the A string or the 9th fret of the G string. You can always check if the note is in tune by playing the open E string (assuming you’re using standard tuning). The same technique can be used for all the notes on a scale. As the great Steve Lawson said himself:
“If you can ‘hear’ a major second to be slightly flat or slightly sharp, then playing that against the open string makes sense. If that’s a less familiar sound to you, then maybe try to hear it as part of the scale, between the root and third, rather than sounding it simultaneously with the open string. The 4th should be a sound that you’re fairly comfortable with, as it’s just an inverted 5th, and the 6th requires the same consideration as the 2nd. Eventually, you should be working towards a level of pitch perception that allows you to hear all the possible intervallic combinations, but that’s perhaps a longer-term project than just hearing and playing the scale tones in tune.”
Practice your ability to hear intervals rather than just comparing with the open note, this is a skill that’s transferable to other fields of playing and will benefit you greatly in the future.
2 – Practice with a tuner.
I personally use a clip tuner for this technique as it is really handy for playing a note and checking it right away on the headstock of the bass, but almost every tuner will do the job here. This is a great technique for when you’re practicing your scales and arpeggios. It makes it super easy to check if you’re playing the note correctly. It’s a very useful technique when you want to slow down and check how a note feels not only in terms of sound but also mechanically under your fingers.
This brings us to another very important point. Intonation on fretless isn’t just how it sounds, it’s also how it feels. It’s very mechanic, especially when playing an unlined fretless. It has a lot to do with how the intervals feel mechanically under your fingers. Make sure also to practice muscle memory. How does the fifth feel under my fingers? How about a major third?
3 – Practice with a sound pad.
Another way to practice intonation is by creating a sound pad, or drone, using a note from a particular chord tone. For this, you can either use a reverb pedal, a delay, or any type of keyboard or digital instrument. A way to do it with a delay pedal (and this probably only works with digital delays, as analog ones will go into self-oscillation mode) is to swell a note in by using a volume control and then crank the delay time to the max getting “infinite repeats” of this sound pad.
With a sound texture going you can then play any bass line or solo in that particular scale and check against the pad if any of the notes sound off.
This method gives us a lot of freedom to experiment with since we are not tied to playing the open string.
4 – Practice with a looper pedal.
Looper pedals are the ultimate practicing tool. We will share with you the two ways we use them to practice intonation, but the uses on those can be close to infinite.
- Record a bassline on a fretted bass and then play it note for note with the fretless on top. Make it sound exactly the same. Then practice the same line but using 3rds, 5hts, and so on. It’s a great way to teach your ears to detect when notes in the interval are off.
- Just like the sound pad, you can always record a bassline on a particular note and then solo on top of it. Using the bass line to check for intonation issues.
As a final note I would like to reinforce a very important concept that ties directly with sound and muscle memory:
Learn to not correct wrong notes. With this I mean, don’t use vibrato or slides to get it right. Instead, try to understand what went wrong. Was the note sharp? Was it flat? How did it feel to play the wrong note? Then play the same but this time try to play the same note in tune. How does it feel now? Both sound wise and mechanically wise. Don’t use vibrato to cover it, own it and try to get it right the next time. It’s a great exercise, even though it’s a rather hard to do consciously.
These are just some ways you can practice your intonation on fretless bass. Do you have more techniques you use for fretless bass intonation you would like to share?
Check out my article: Bass Players Of Naughty
Photos: Bass Musician Magazine – NAMM 2020 at the F BASS booth


In the world of bass playing, technique is often misunderstood. Some musicians see it as a display of speed, flashy finger movements, or endless exercises disconnected from real music. But true technique is much deeper than that. Technique is not about showing off; it is about freedom, control, expression, and longevity.
A bassist with solid technique can communicate ideas more clearly, perform with confidence, and adapt to virtually any musical situation. Whether playing gospel, jazz, rock, funk, Latin music, worship, or fusion, technique becomes the bridge between musical imagination and physical execution.
Technique Serves the Music
The ultimate purpose of technique is not perfection; it is expression. Every groove, every note, every articulation depends on the player’s ability to execute ideas naturally and consistently. Good technique allows the bassist to focus less on physical struggle and more on musical storytelling.
When technique is underdeveloped, the body becomes tense. Timing suffers. Tone becomes inconsistent. Fatigue appears quickly. Over time, poor habits can even lead to injuries that limit a musician’s growth and career.
On the other hand, an efficient technique creates relaxation. Relaxation creates control. Control creates confidence. And confidence allows the music to flow naturally.
Consistency Creates Identity
One of the most overlooked aspects of technique is consistency. Great bassists are recognizable not only because of what they play, but because of how they play it. Their touch, articulation, muting, dynamics, and timing become part of their musical identity.
Technique shapes tone.
The way a player attacks the strings, controls muting, positions the hands, and manages dynamics all contribute to a unique sonic fingerprint. Two bassists can play the exact same line and sound completely different because technique influences every detail of sound production.
Slow Practice Builds Great Players
Many musicians want immediate results, but strong technique is built patiently. Slow, intentional practice remains one of the most powerful tools for improvement.
Practicing slowly develops:
• Accuracy
• Muscle memory
• Relaxation
• Timing
• Endurance
• Consistency
Speed should always be the result of control, never the opposite.
Some of the world’s greatest bassists spent years refining fundamentals before developing the advanced vocabulary they are known for today. Scales, arpeggios, muting exercises, rhythmic studies, and finger independence may not seem exciting at first, but they form the foundation that supports creativity.
Technique and Musical Longevity
Proper technique is also an investment in a musician’s future. Many professional players perform for hours every day, travel constantly, and maintain demanding schedules. Without healthy mechanics, physical strain becomes inevitable.
Good posture, relaxed shoulders, proper thumb positioning, efficient finger movement, and balanced hand mechanics help prevent unnecessary tension and injury. Technique is not only about sounding better but also about protecting the body that makes the music possible.
Beyond Exercises
Real technique goes beyond exercises and enters real musical situations. A bassist should practice applying technical concepts directly into grooves, fills, improvisation, and live performance settings.
The goal is never robotic playing. The goal is musical freedom.
When technique becomes internalized, the bassist no longer thinks about mechanics. The hands simply respond to the musical ideas in real time. That is when technique disappears and artistry begins.
Every bassist develops their own voice, but technique is what allows that voice to be heard clearly.
It is the invisible foundation behind confidence, groove, tone, creativity, and expression. Technique is not the destination. It is the vehicle that carries the music further. And in the end, the greatest technique is the one that allows the listener to feel something unforgettable.
Ready to take your rhythm section from good to unforgettable? It’s time to dive into bass and drums practice exercises that actually work.
If you and your drummer have been jamming for a while but still feel like something’s “off,” the missing ingredient is likely structured groove practice. Playing songs is fun, but real groove is forged in the fire of repetition, timing drills, and trust-building exercises.
So grab your drummer (or a drum machine), warm up your fingers, and get ready to go deeper than ever into the pocket.
Why Groove Practice Matters More Than Rehearsal
There’s a big difference between rehearsing a set list and actually practicing groove. Rehearsals are about song structure, transitions, and cues. But bass and drums practice exercises are all about feel.
Here’s why it matters:
- You develop musical chemistry
- You improve your internal timing
- You learn to communicate nonverbally
- You build consistency that carries into live shows
These exercises will help you achieve that, one locked-in groove at a time.
Exercise 1: The 2-Bar Loop Challenge
This is one of the simplest, most effective bass and drums practice exercises out there, and it’s addictively fun.
How to do it:
- Choose a simple 2-bar drum groove.
- As the bassist, play a simple line that locks into the kick and supports the snare.
- Loop those two bars… again and again… for at least 5 minutes straight.
- Focus on micro-adjustments: tone, dynamics, feel.
Why it works:
Repetition builds groove memory. This exercise strengthens your timing and teaches you to feel slight variations in the drummer’s pocket.
Exercise 2: Play With and Without a Click
Drummers and bassists both benefit from click practice, but here’s the twist: learn to feel the groove with the click, then test it without.
How to do it:
- Set a metronome to 70–80 BPM.
- Play a 4-bar groove with the click for a minute.
- Mute the click, and keep playing for another 2–3 minutes.
- Bring the click back in. Are you still in time?
Why it works:
This tests your internal clock as a unit. A tight rhythm section should be able to stay locked, even when the external reference disappears.
Exercise 3: Trade Eighths and Sixteenths
This one boosts your responsiveness and strengthens your groove vocabulary.
How to do it:
- Drummer starts with a basic beat.
- You play eighth notes for two bars.
- Switch to sixteenth notes for the next two bars.
- Go back and forth for 5+ minutes.
Optional twist: Have the drummer switch up their pattern too… ghost notes, syncopated hi-hats, rim shots. You adapt.
Why it works:
It trains you to adapt rhythmically while staying glued to the groove.
Exercise 4: Groove Call and Response
Think of this like a musical conversation.
How to do it:
- Drummer plays a 1- or 2-bar groove.
- You “respond” with a groove that complements or mirrors it.
- Switch… now you play first, and the drummer answers.
- Keep the phrases short and groovy.
Why it works:
It develops groove intuition and trains you to hear rhythmic ideas and respond with intention.
Exercise 5: The Ghost Note Sync-Up
This one’s a deeper dive. Ghost notes are subtle, so this is about listening and matching energy, not just rhythm.
How to do it:
- Drummer plays a groove with ghost notes on the snare.
- You add subtle ghost notes (muted plucks, low-volume notes) in between your main bass notes.
- Try to mirror the drummer’s energy, not necessarily their exact pattern.
Why it works:
Subtlety = groove mastery. Matching ghost note dynamics helps you blend and groove like pros.
Exercise 6: Dynamic Drops
Playing tight isn’t just about time, it’s about touch. This exercise sharpens your control.
How to do it:
- Groove at medium intensity.
- At random intervals, drop to whisper-quiet playing.
- Then build back up to full volume, together.
- Do it without talking or cueing—just eye contact or feel.
Why it works:
Real rhythm sections control the emotional flow of a song. This teaches dynamic awareness and builds musical trust.
Bonus: Record Yourself
No matter which bass and drums practice exercises you do, always record yourselves, even on a phone.
Listen back. What worked? What felt stiff? Where did the groove pop?
You’ll improve twice as fast when you can hear where you’re tight (or not) as a rhythm section.
How Often Should You Practice Together?
Ideally:
- Once a week for 30–60 minutes of groove-specific practice
- Rehearsals are separate… this is groove-only time
- Consistency is more important than length
You’ll start to notice the groove showing up in rehearsals, gigs, and recordings.
Remember… Groove Isn’t Luck, It’s Built
A tight rhythm section doesn’t happen by accident. It’s built on intention, sweat, patience, and yes, plenty of mistakes. The more bass and drums practice exercises you do together, the more effortless the groove will feel.
Remember: the audience may not know exactly what you’re doing, but they’ll feel it. That’s the power of a locked-in groove.
So next time you and your drummer get together, skip the set list. Start with the groove. The music will thank you for it.
My next series of lessons using the pentatonic scale will continue exploring several sequence variations and the ideas they generate. After working on these sequences as strict exercises, melodic ideas should begin to creep into your playing. Spend enough time on each exercise until they become muscle memory. Make a conscious effort to apply these ideas to your groove and solo repertoire.
The first exercise follows a pattern starting with the second scale degree, third, fifth, and root. Follow the pattern up and back through the scale.

The second exercise starts with the pattern– root, 3rd, second scale degree, and fifth. Follow the pattern up and back, respectively.

The third exercise starts with the pattern—root, 5th, second scale degree, and the third. Follow the pattern up and back, respectively.

It will take more than one practice session to commit the ideas to memory. Make a commitment to making these exercises a normal part of your practice routine. Good luck!
Being a great bassist isn’t just about scales, chops, or playing complex lines. At a certain point, you realize the real difference between a solid player and a true professional comes down to one thing: how you think about the music.
Thinking like a professional bassist means developing a deeper level of awareness, where every note has a purpose, every space is intentional, and every decision supports the music.
1. Know Your Role
The bass sits right between harmony and rhythm. We’re not just there to “hold it down”, we help shape the feel and direction of the groove.
A professional bassist is always asking:
- What does this song really need?
- Do I need to lay back, push forward, or stay out of the way?
It’s not about playing more—it’s about playing with purpose.
2. Listen First, Then Play
One of the biggest mistakes players make is thinking about what to play before actually listening.
Real listening means:
- Locking in with the drummer
- Following the harmonic movement
- Being aware of the band’s dynamics
Pro bassists don’t just react, they anticipate what’s coming next.
3. Groove Comes First
Technique matters… but groove is everything.
You can play all the right notes, but if the feel isn’t there, it won’t connect. On the flip side, a simple bass line with great time and feel can make the entire band sound better.
At the professional level, the priorities are clear:
- Time
- Tone
- Feel
Everything else comes after that.
4. Leave Space
Silence is part of the music.
Knowing when not to play is a skill that separates experienced players from mature musicians. Space gives the groove clarity and lets the music breathe.
You don’t have to fill every bar.
Sometimes the best note is the one you don’t play.
5. Serve the Music
The ego can get in the way of great playing.
Professional bassists aren’t trying to impress; they’re trying to make the music feel right. That means making choices that support the song, even if they’re not flashy.
That’s real musical maturity: doing what the music needs, not what your ego wants.
Thinking like a professional bassist is a lifelong process.
It’s about constantly growing in how you listen, how you feel, and how you respond in the moment.
At the end of the day, it’s not just about the notes you play; it’s about how you support, connect, and elevate the music.
“Play less. Listen more. Serve the music… always.”
— Jaime David Vázquez
Hello bass players and fans of bass playing! This month, we’re going to talk about The Art of Playing Live! ARE YOU READY TO GROOVE?
There’s a powerful shift that happens the moment you step on stage.
Practicing at home is about control.
Playing live is about connection.
And as bass players, we live right in the center of that transformation.
We are not just supporting the band… we are anchoring the entire musical experience.
Groove Over Everything
In a live setting, perfection is overrated.
The audience won’t remember how many notes you played… but they will remember how you made them feel. The way your bass locks in with the kick drum can move an entire room without saying a word.
Playing less, with intention, often creates more impact than filling every space.
Great bass players understand this: Space is part of the groove.
Listening is Your Superpower
One of the most underrated skills on stage is deep listening.
Your connection with the drummer defines your foundation.
Your awareness of the vocalist shapes your dynamics.
Your sensitivity to the band creates cohesion.
When you truly listen, you don’t just play your part, you become part of the conversation.
And that’s when live music stops being structured… and starts being alive.
Presence Speaks Louder Than Notes
You don’t need to be front and center to command attention.
Presence is not about position—it’s about energy.
A bass player who is engaged, expressive, and connected elevates the entire performance. Your body language, your movement, your eye contact—it all communicates something beyond the instrument.
If you feel the music, the audience will feel it too.
Preparation Creates Freedom
The best live moments often feel spontaneous—but they are built on preparation.
Knowing the structure, transitions, and dynamics of each song gives you the confidence to explore without losing control.
When you’re prepared, you don’t overthink.
You react. You adapt. You create.
And that’s where the magic lives.
Adaptability is the Real Skill
No two stages are the same.
Different rooms. Different sound systems. Different audiences.
Sometimes, even different band dynamics.
A strong bass player reads the room and adjusts.
Maybe you simplify.
Maybe you dig in harder.
Maybe you leave more space.
Live performance is a living organism, and your role is to keep it grounded while allowing it to breathe.
Playing live is not just a performance… it’s a responsibility.
As bass players, we don’t just play notes… we shape the feel, the pulse, the emotional core of the music.
So the next time you step on stage, remember:
You are not in the background.
You are the foundation.
And everything moves because you do.
Stay tuned for more great stuff in the next issue and keep in touch with #bassmusicianmag,
#basslines, #bmmbasslines, #keepgrooving, #keepthegroovealive&kicking, #jdvinstrumental, #groovewars, #fullbassattack, #jdv, #boricuabass, #groovingtheworld, #bassgrooves, #groovemaniac, #6stringbass, #goodpracticemakesperfect #theartofplayinglive, #livemusic

Interview With Bassist Ellen Alaverdyan and Guitarist Hovak Alaverdyan

Gear News: Fender Honors James Jamerson with a 1962 Precision Bass

Artist Update With The Revivalists’ Bassist George Gekas

Maestro Ron Carter, Sharing the Spirit – June/July 2026 Issue

New Music: Danielle Nicole, Tug Of War

Right Hand Technique Strategies with Dr. Randy Kertz

May 4 Edition – This Week’s Top 10 Basses on Instagram
May 11 Edition – This Week’s Top 10 Basses on Instagram
May 18 Edition – This Week’s Top 10 Basses on Instagram