Gear Reviews
Review: Empress Bass Compressor
Review of the Empress Bass Compressor…
Compressor pedals seem to be contentious territory for bassists. Some players swear by them as the glue that helps keep their levels stable and consistent, while others feel they squash their dynamic range and limit their ability to play with nuance and touch. I like certain compressors for their ability to fatten up my sound and bring the bass forward, acting as a bit of a “fat boost” if you will, but I don’t want to hear coloration, or any pumping or squashing. So, for me, it’s critical to have control over the various compression parameters to ensure that I’m getting all the attributes I want, and nothing I don’t.
There are a lot of compressor pedals available that are suitable for bass, which can most simply be broken up into a couple of different camps: The simpler vs the more complex, and the transparent/clean vs the more voiced/colored units. I’ve owned a handful of compressor pedals over the years, bass-specific and otherwise, and it’s taken me a minute to figure out exactly what I like. When I first got into compression, I understandably gravitated towards the simpler ones, some of which sounded darn good. While the 1 or 2 knob comps are less overwhelming and typically harder to get a bad sound out of, the cost of simplicity is lack of control over individual factors affecting behaviors like attack, decay, threshold, ratio, etc. The flipside of course is that the more complex compression pedals require a working knowledge of how a compressor works. Thankfully, users who spend the time to learn how to dial in the parameters to their liking are rewarded with results that best suit their preferences.
As far as the ‘transparent vs. voiced’ question, I’ve gone back and forth over the years. There are some REALLY good-sounding compressor pedals with built-in desirable coloration that sound fantastic. Personally, my journey with compressors has led me to look for units that have studio-level transparency with a high degree of adjustability and some key features that allow me to indulge my very finicky degree of preference. My best results seem to come from getting voicing and coloration from other effects or preamps specifically for that purpose, so that color is not automatically tied to the compression effect. Others like to achieve both goals with one pedal. Your mileage, as always, may vary.
To that end, and to get to the point, I have been using the OG Empress Compressor for the last several years with great satisfaction. The original dark blue Empress is just a classic. It checks all the boxes for the versatility I want while sounding transparent and clean. The huge bank of LED’s is fantastic for level setting, and the whole package just plain works like a charm.
Naturally, when Empress announced they were releasing a new bass-specific compressor in a smaller chassis with top-mounted jacks and some bass-specific features, I was all in.

So too was the rest of the market it seemed, and the initial couple of runs went quick. It took me a while to finally get my hands on one, and I’m happy to report that it was well worth the wait.
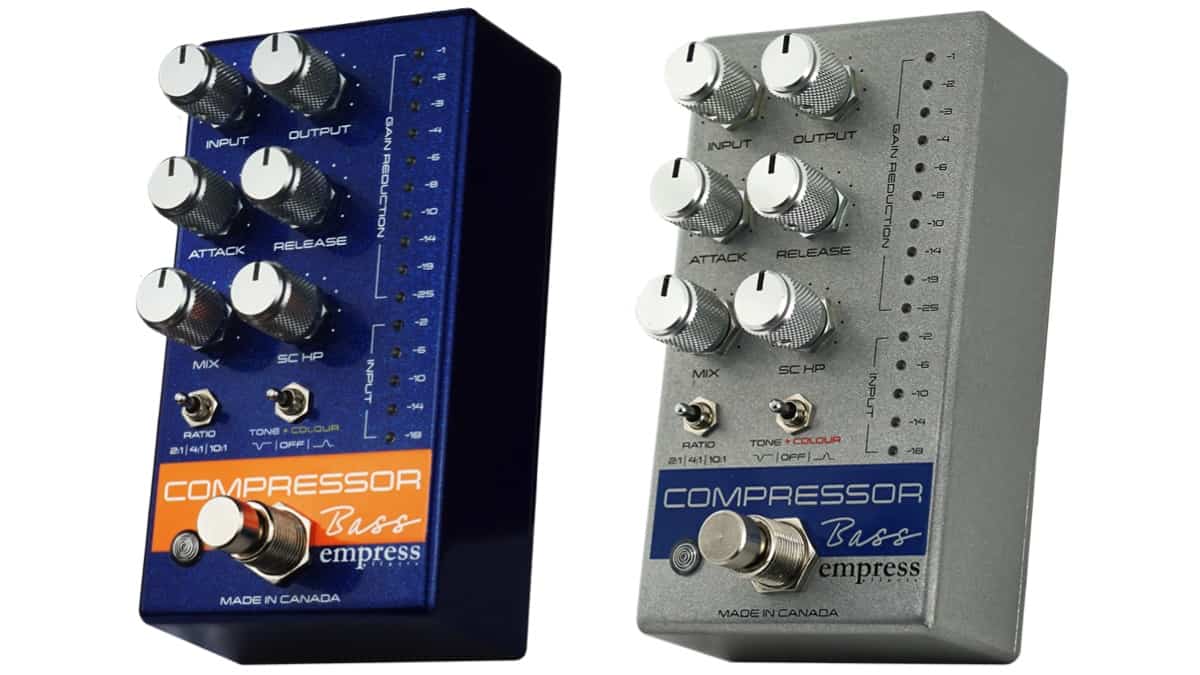
Like the original Empress Compressor, the Empress Bass Compressor has an Input knob to control how hard you drive the compressor as well as an Output level to get the desired amount of signal coming out of the pedal. I like setting the input so that it is engaging the compressor but not slamming it and setting the output to roughly match the bypassed signal so that it plays nice with input-sensitive effects downstream. Like the original, the Bass Compressor has great LED metering: One set to show how much signal is coming in, and one to show the level of gain reduction (how much compression the unit is generating).
Dedicated Attack and Release knobs allow you to precisely control how fast or slow the compressor latches on to and releases your signal, effectively allowing you to sculpt how the pedal responds, and how long it holds on to your sound before letting go. This is where a lot of the character of the compression is controlled.
One of my favorite features of both the new and old Empress Compressors is the Mix knob, which lets one fine-tune how much of the sound is affected; perfect for the guy like me who doesn’t really want to hear the compressor working and ultimately wants a subtle effect. The Sidechain High Pass knob is one of two new standout features that set the Empress Bass Comp apart from the original. In a nutshell, as you turn this knob up, it allows more of your low end to pass through unaffected, with compression applying increasingly to the low mids and mids. This is great for those who want to tame their upper frequencies while retaining a full low end with less gain reduction in that register. Those who feel that compressors mess with their dynamics will appreciate this control, as it lets them feel the impact of the bass as usual but can help wrangle the transient spikes in the treble and upper mids. In conjunction with the Mix knob, these two controls offer a great way to increase the subtlety and transparency of the Empress Bass Compressor while still retaining the effect.
A 3-way switch allows users to choose between a subtle 2:1 compression ratio, a more standard 4:1 ratio, or a more extreme 10:1 ratio. I would prefer a ratio knob offering more granular control over ratio, but I’ve actually never found myself struggling to find the right choice with these 3 settings, as they’re very well chosen for light, medium, and heavy compression settings. The other 3-way switch controls the other new standout feature, the “Tone and Colour” setting, which essentially transforms the Empress into a more colored compressor on demand. While the middle setting offers the flat transparent sound I am used to, there are gentle mid-scoop and mid-bump settings, which are really well voiced and not too overt, but shift overall tonality in a musical and effective way. This makes the Empress Bass Comp compete strongly in both the “transparent” and “voiced” compressor camps. One could argue that because it does both very well, its double threat capability makes it a no-brainer.
Lastly, like the OG Empress comp, the Empress Bass Compressor features a 1/8” mini-input jack for sidechaining. This is the old studio trick of triggering your compressor not by your input signal, but from an external source. One classic application for this would be using the attack of the kick drum to compress the bass signal, sometimes used to create dynamics and space for the kick drum by ducking the bass signal when the kick drum hits. This is just one example though: the sky is truly the limit for all the creative ways this can be used on stage and in the studio.

Overall, the new Empress Bass Comp is a slam dunk.
It took everything I loved about the original, added some fantastic new bass-specific features, put it in a smaller, more pedalboard-friendly format, and gave it a sharp makeover. The build quality seems even better than the original, with more robust feeling pots and jacks and a wicked royal blue sparkle paint job (also available in silver sparkle). Kudos to Empress for taking something great and truly making it better for bassists. The new Empress Bass Compressor retails for $249.00.
For more info on the Empress Bass Compressor, visit online at empresseffects.com/products/bass-compressor


Disclaimer:This pedal was kindly provided by Hotone for the purpose of this review. However, this does not influence our opinions or the content of our reviews. We strive to provide honest, unbiased, and accurate assessments to ensure that our readers receive truthful and helpful information.
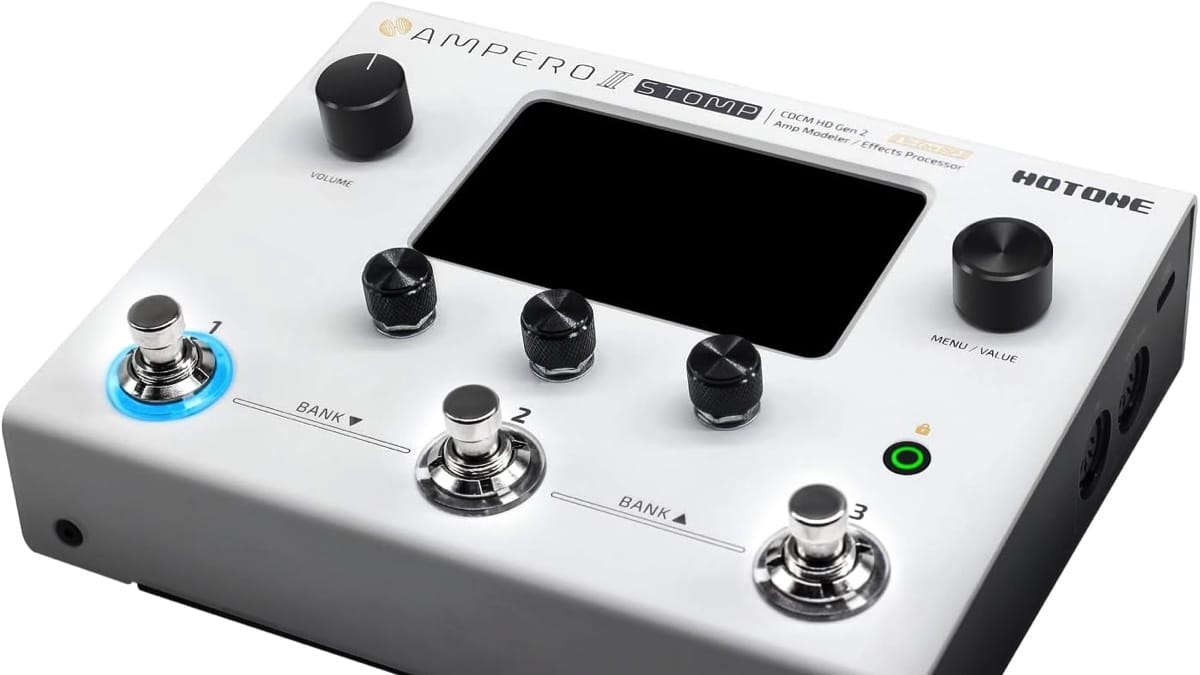
Compact Design, Serious Bass Capability
The Hotone Ampero II Stomp sits in an interesting space for bass players. It is compact enough to replace a pedalboard, powerful enough to function as a full DI rig, and flexible enough to cover everything from clean studio tones to aggressive modern drive setups. While it is often marketed primarily toward guitar players, it actually reveals a surprising amount of depth when approached from a bass workflow perspective. For modern bassists balancing live performance, silent stages, recording sessions, and fly-date practicality, the Ampero II Stomp feels increasingly relevant.
At its core, the unit is built around Hotone’s CDCM HD and F.I.R.E. modeling engine, offering amp modeling, cabinet simulation, extensive effects, IR loading, and flexible routing in a compact stompbox format. You get over 80 amp models, a large effects library, stereo operation, parallel routing, MIDI support, USB audio interface functionality, and up to 12 simultaneous effect blocks. For a device this small, the feature set is substantial and immediately practical in real-world bass applications.
Routing Flexibility Built for Modern Bass Rigs
What makes the Ampero II Stomp particularly compelling for bass players is its routing flexibility. Parallel signal paths allow you to preserve low-end clarity while introducing distortion, compression, modulation, or saturation on a separate chain, a critical feature for contemporary bass tones. This makes it easy to create clean/dirty blends, bi-amped textures, wet/dry ambient rigs, or heavily processed atmospheric sounds without sacrificing punch and articulation.
Players working in progressive metal, worship, fusion, or modern pop contexts will especially appreciate how naturally the unit adapts to layered and dynamic signal chains. The touchscreen interface also deserves more credit than it often receives. In practice, editing feels faster and more immediate than many menu-heavy modelers in the same price range. Dragging blocks, adjusting routing, and building presets become intuitive after only a short learning curve.
That matters because bass rigs often require more nuanced signal management than guitar setups, particularly when preserving transient response and low-frequency integrity. The visual workflow encourages experimentation instead of slowing it down.
Amp Models and IR Performance
The amp models themselves are solid and musically usable, with the Ampeg-inspired options standing out as the most immediately convincing for bass. Vintage-style tube warmth, modern clean headroom, and slightly driven SVT-style grit are all accessible with minimal tweaking.
However, the unit noticeably improves when paired with high-quality third-party impulse responses. Good bass IRs add depth, air, and realism that elevate the direct tones from “good digital modeler” territory into something that sits naturally in a live mix or recorded production. This is particularly noticeable in in-ear monitor environments where cabinet realism becomes more exposed.
Compression performance is another underrated aspect of the unit. Bass players rely heavily on compression not only for sustain, but also for consistency and dynamic control. The Ampero II Stomp offers enough flexibility to cover subtle leveling, punchy slap compression, and more aggressive limiting for modern rock and metal applications. Combined with EQ blocks and parallel routing, it becomes possible to sculpt highly polished, mix-ready tones directly inside the unit without relying heavily on external processing.
Effects and Sound Design Possibilities
Effects quality is generally strong, especially in the modulation and ambient categories. Delays, reverbs, and chorus effects sound spacious and musical, making the unit particularly effective for cinematic bass textures, post-rock soundscapes, and worship-style ambient playing.
Octave and synth-style effects are also surprisingly usable when dialed in carefully, adding further versatility for experimental players. Drive and distortion models are slightly more inconsistent, with some patches requiring additional EQ shaping to maintain low-end authority. Fortunately, the routing options make it relatively easy to compensate by blending unaffected low frequencies back into the signal.
Live Performance and Recording Workflow
In live situations, the Ampero II Stomp performs convincingly as a direct-to-FOH solution, backup rig, or complete ampless touring setup. Balanced outputs, stereo capability, MIDI implementation, and compact dimensions make it practical for professional stage environments where portability matters.
For touring bassists or session players carrying multiple instruments and limited luggage, the ability to fit an entire rig into a backpack-sized footprint is a significant advantage. The onboard footswitches are responsive and functional, though players requiring extensive real-time scene switching or expression control may still prefer adding an external MIDI controller.
As a recording interface, the unit continues to impress. USB audio support allows direct tracking, reamping, and mobile production workflows without additional hardware. Latency performance is stable enough for home studio use, and the ability to move seamlessly between practice, songwriting, demo recording, and professional tracking adds to the unit’s overall value.
For content creators and remote session musicians, the all-in-one workflow is particularly appealing.
Limitations and Final Verdict
There are still limitations. The bass-specific ecosystem surrounding the platform is smaller than what players may find with systems from Line 6 or Fractal Audio Systems, and some factory presets clearly lean toward guitar-oriented use cases. Certain effects also reveal DSP limitations when running highly demanding patches involving dual amps, pitch shifting, and extensive ambient processing simultaneously.
While the processing power is more than adequate for most practical scenarios, power users may eventually encounter those ceilings.
Even so, the overall value proposition remains impressive. The Ampero II Stomp succeeds because it balances portability, flexibility, and sound quality exceptionally well for its size and price range. It may not have the ecosystem depth or market dominance of larger competitors, but it consistently delivers professional-level results in compact form.
For bass players building modern direct rigs, simplifying touring setups, or entering the world of ampless performance without sacrificing tonal control, the Hotone Ampero II Stomp stands out as one of the more underrated and genuinely capable compact modelers currently available.
Available online at Amazon.com

Disclaimer: This pedal was kindly provided by Walrus Audio for the purpose of this review. However, this does not influence our opinions or the content of our reviews. We strive to provide honest, unbiased, and accurate assessments to ensure that our readers receive truthful and helpful information.
There’s no shortage of bass gear promising to elevate your tone. From budget-friendly surprises to high-priced disappointments, the market has never been more crowded, or more inconsistent. Every so often, though, something arrives that challenges expectations rather than simply trying to meet them.
The Mantle is one of those pieces.
Developed with a clear, almost stubborn sense of purpose, this pedal doesn’t attempt to be everything. Instead, it focuses on doing one job exceptionally well: delivering a studio-quality front end for bass players who care deeply about their core tone.
A Studio Concept on the Floor
Rather than following the typical pedal blueprint, stacking features, adding effects, and maximizing flexibility, the Mantle takes its cues from the recording world. Its design reflects the kind of signal conditioning usually reserved for high-end studio environments, where tone is shaped at the earliest possible stage.
The architecture blends influences from classic preamp designs. There’s a sense of weight and density reminiscent of vintage input stages, paired with the articulation and forward presence associated with punchier output circuits. The result is not a nostalgic recreation, but a hybrid approach that feels intentional and modern.
A key part of this identity comes from the inclusion of transformer-based stages. This is unusual in pedal format, and it plays a significant role in how the Mantle responds. The low end feels more grounded, the midrange gains subtle complexity, and the overall signal carries a depth that’s often missing from purely solid-state designs.
Equally important is the available headroom. Internally operating at a higher voltage than its external power supply suggests, the Mantle maintains clarity even when fed by high-output instruments. Active basses, in particular, benefit from this, retaining their dynamics without unwanted compression or breakup.
Control Without Clutter
At a glance, the control layout might seem restrained, especially considering the price point. But this isn’t a limitation so much as a deliberate design choice.
The gain control doesn’t behave like a typical drive circuit. Instead of pushing the signal into distortion, it adjusts how the internal stages are engaged. As it increases, the tone becomes denser and more harmonically rich, but without crossing into obvious saturation. It’s a subtle shift, yet one that becomes increasingly apparent in a mix.
The EQ section follows a similarly focused philosophy. Rather than continuous knobs, it uses stepped controls with fixed increments. This approach favors precision and repeatability over experimentation. Each position feels considered, making it easy to dial in a sound and return to it later without guesswork.
More importantly, the EQ is voiced to enhance rather than reshape. Low-end adjustments add authority or tighten the response without overwhelming the signal, while the high-frequency control introduces clarity or smoothness depending on the direction. It’s less about correction and more about refinement.
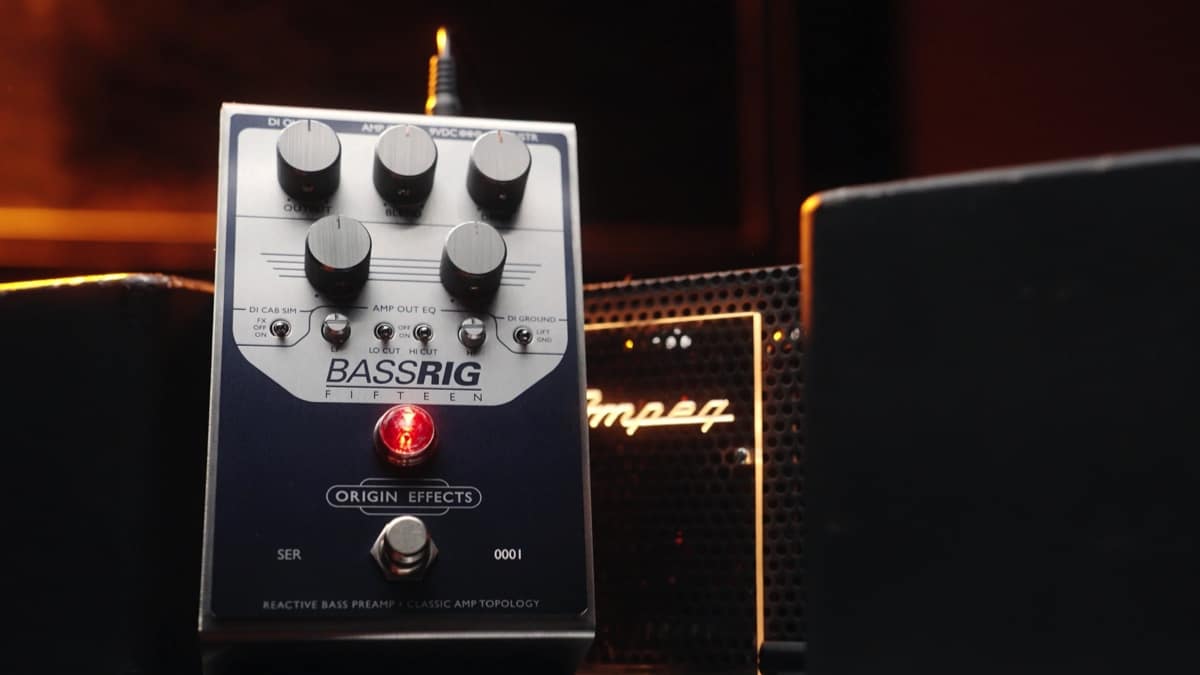
Additional features, like selectable input sensitivity and a balanced output with ground lift out the package, ensuring compatibility across a wide range of setups.
Tone at the Source
What sets the Mantle apart is not just how it sounds, but where it operates in the signal chain. Instead of relying on downstream gear to define the final tone, it encourages players to establish that character right from the start.
This approach becomes particularly noticeable when using the direct output. Many DI signals can feel somewhat flat or disconnected, especially in recording scenarios. Here, there’s a noticeable sense of dimension and cohesion, closer to what you might expect from a well-mic’d amplifier.
By the time the signal reaches the mixing stage, much of the tonal work is already done.
Real-World Applications
In practice, the Mantle adapts easily to different roles, depending on the player’s needs.
For some, it will function as an always-on foundation, essentially becoming part of the instrument’s voice. In live environments, the consistency of its direct output offers a reliable alternative to unpredictable backline setups, giving front-of-house engineers a polished signal every time.
In the studio, it can streamline the recording process by reducing the need for additional processing. The captured tone already carries weight, clarity, and balance, allowing it to sit naturally in a mix with minimal intervention.
It also fits neatly into modern performance contexts, including silent stages and in-ear monitoring systems, where the direct signal defines the entire listening experience.
Not for Everyone… and That’s the Point
The Mantle’s strengths are rooted in its focus. It excels at delivering a refined, high-quality bass tone with minimal fuss. However, that same focus means it won’t appeal to players looking for extensive tonal shaping, onboard effects, or aggressive character.
There’s no distortion circuit, no compression, and no deep EQ sculpting. It doesn’t aim to replace a full pedalboard; it assumes you already have one, or that you don’t need one.
Cost is another factor that can’t be ignored. Positioned firmly in premium territory, it invites comparison not with standard pedals, but with dedicated preamps and studio-grade DI solutions.
A Different Way of Thinking
The Mantle ultimately asks bassists to rethink their approach. Instead of treating tone as something to be fixed later, it places that responsibility and opportunity right at the beginning of the chain.
It doesn’t dramatically alter your sound. What it does is make your existing tone feel more complete: fuller, clearer, and more deliberate.
For players willing to embrace that philosophy, it offers a compelling alternative to traditional setups, one that brings studio sensibilities directly to the pedalboard without compromise.
Available online at Amazon.com
Gear Reviews
Review: Neural DSP Darkglass Ultimate… From Signature Tone to Full Production Ecosystem

For years, the Darkglass name has been closely tied to the evolution of modern bass tone. From tight, aggressive drive to articulate low-end clarity, its sonic fingerprint has become a staple across heavy, progressive, and even crossover genres. With the release of Darkglass Ultimate, Neural DSP takes that familiar identity and pushes it far beyond amp simulation, delivering something that feels less like a plugin and more like a complete bass production environment.
This isn’t just an update. It’s a shift in scope.
Expanding a Proven Foundation
When Neural DSP first introduced the Darkglass plugin line in 2018, the goal was straightforward: capture the essence of the brand’s most iconic pedals in a digital format. The Darkglass B7K Ultra bass preamp pedal and Darkglass Vintage Ultra bass preamp pedal formed the backbone of that effort, offering two distinct but complementary tonal philosophies.
Darkglass Ultimate retains those core voices, but places them inside a much broader framework.
The B7K side still delivers its signature precision… tight low end, defined attack, and an aggressive edge that cuts cleanly through dense arrangements. In contrast, the Vintage circuit leans toward a more rounded, harmonically rich response, evoking the feel of classic tube amplification without becoming overly soft or indistinct.
More importantly, these tones don’t feel like endpoints. They act as foundations, strong, mix-ready starting points that encourage further shaping rather than requiring corrective work.
Beyond Amp Simulation
Where Darkglass Ultimate separates itself from earlier iterations is in how much ground it covers. Instead of focusing solely on preamp and cabinet emulation, it builds a complete signal chain designed to take a bass part from initial idea to final production, without leaving the plugin.
The pre-effects section is comprehensive, including compression, envelope-based filtering, octave layering, and fuzz. These aren’t treated as add-ons; they’re integrated into the signal path in a way that feels intentional and musical, encouraging experimentation from the very first note.
Post-effects expand that palette further. Modulation and delay are implemented with a level of quality that invites actual use rather than occasional novelty. In particular, the delay stands out, not just as a functional tool, but as a genuinely inspiring one. It adds space and movement without overwhelming the fundamental tone, making it surprisingly effective even in contexts where bass delay might typically feel excessive.
Cabinets, EQ, and Precision Control
The cabinet section introduces modeled Darkglass enclosures, including the DG210C (2×10) and DG810ES (8×10). Combined with adjustable microphone placement, this allows for detailed tonal shaping at the final stage of the signal chain.
Supporting this is a robust EQ architecture. Between the onboard controls inherited from the original pedal designs and a dedicated 9-band graphic EQ, there’s significant flexibility available. Subtle corrections, surgical adjustments, or more dramatic tonal shifts are all within reach, depending on the needs of the track.
This level of control makes it possible to move quickly from raw tone to mix-ready sound, often without relying on additional processing.
Presets That Go Beyond Genre
Preset libraries can often feel like filler, but that’s not the case here. Contributions from players such as Adam “Nolly” Getgood and Alex Webster highlight the plugin’s strengths in heavier styles, offering polished, aggressive tones that sit naturally in a mix.
At the same time, the in-house presets from Neural DSP broaden the scope considerably. There are synth-inspired textures, ambient layers, funk-driven tones, and deliberately extreme fuzz patches that push the plugin into more experimental territory.
The result is a tool that resists being boxed into a single genre. While its roots are clearly in modern rock and metal, its capabilities extend well beyond that space.
Workflow and Usability
One of the most compelling aspects of Darkglass Ultimate is how efficiently it integrates into a working environment. Built-in utilities, such as a tuner, metronome, and transpose function, may seem like small additions, but they contribute to a smoother, more self-contained workflow.
In practice, the plugin performs reliably and responds quickly. Recording sessions feel fluid, and tones translate well into a mix with minimal additional processing. That immediacy is a major advantage, particularly for players working in home or project studio settings where speed and simplicity matter.
From Studio to Stage
Although clearly designed with recording in mind, Darkglass Ultimate also opens the door to live applications. With the addition of a MIDI controller, it can function as a highly adaptable performance rig, offering real-time control over effects, presets, and signal routing.
For players comfortable incorporating a laptop into their setup, this creates a powerful alternative to traditional hardware-based rigs, especially when portability and flexibility are priorities.
A Logical Evolution
Darkglass Ultimate doesn’t abandon what made earlier versions successful; it builds on it. The core tones remain intact, but they’re now part of a much larger system designed to support the entire creative process.
Rather than thinking of it as a plugin that emulates a pedal, it makes more sense to view it as a production tool centered around a specific tonal identity. One that starts with the recognizable Darkglass sound, but doesn’t stop there.
For bassists who want a streamlined path from idea to finished track, and the flexibility to explore along the way, it represents a significant step forward in how software can support both tone and workflow.
Visit online at neuraldsp.com/
Disclaimer: This pedal was kindly provided by Origin Effects for the purpose of this review. However, this does not influence our opinions or the content of our reviews. We strive to provide honest, unbiased, and accurate assessments to ensure that our readers receive truthful and helpful information.
There’s a certain kind of bass tone that doesn’t shout for attention, yet somehow defines the entire track. You hear it on records where everything just sits, where the low end feels effortless, supportive, and impossibly musical. It’s rarely about aggression. More often, it’s about control, warmth, and a sense that the instrument is breathing alongside the band.
That’s the space the BassRig Fifteen occupies.
Origin Effects has built a reputation around precision gear that doesn’t just approximate vintage equipment, but attempts to understand it at a deeper level. With the BassRig Fifteen, they’ve turned their attention to one of the most recorded bass amp sounds in history and distilled it into a compact, all-analogue format.
But this isn’t a nostalgia piece. It’s a tool designed for modern players who need that sound without the complications that usually come with it.
From the first few notes, what stands out isn’t a specific frequency or EQ curve; it’s the way the pedal responds. There’s a softness to the transient, a subtle compression that feels organic rather than imposed. Notes bloom rather than snap, and even simple lines take on a sense of weight and intention.
It doesn’t behave like a typical pedal. In fact, thinking of it as an “effect” feels slightly misleading. The BassRig Fifteen is closer to a front-end, something that reshapes the entire way your instrument interacts with the rest of your signal chain.
Push it gently, and it rewards you with rounded, articulate lows and a smooth top end that never gets brittle. Dig in harder, and the texture thickens, introducing harmonic complexity without tipping into anything that feels overly saturated. It’s a very specific kind of drive, more studio saturation than stage distortion.
One of the most impressive aspects is how easy it is to maintain clarity. Bass players are used to compromise when adding gain, losing low-end definition, or watching their sound disappear in a mix. Here, that trade-off feels largely absent. The core of your tone remains intact, even as the character evolves around it.
This makes the pedal particularly compelling in recording scenarios. Plugging directly into an interface via the built-in DI yields a sound that already feels “finished.” There’s a natural sense of space and balance, as though a cabinet has already been carefully mic’d and placed. It doesn’t require much in the way of corrective EQ or additional processing to sit correctly.
Live, that same consistency becomes a different kind of advantage. Engineers get a predictable, mix-ready signal. Players get the reassurance that their tone isn’t being left to chance night after night.
What’s interesting is how restrained the whole experience feels. In an era where many pedals compete on extremes, more gain, more options, more everything, the BassRig Fifteen takes a narrower path. It focuses on doing one thing exceptionally well, and trusts that players will understand the value in that.
That doesn’t mean it’s limited. There’s enough flexibility to adapt to different instruments, playing styles, and rigs. But the boundaries are intentional. This isn’t about radically transforming your sound; it’s about refining it.
And that distinction matters.
For players chasing vintage-inspired tones, the appeal is obvious. But even outside of that world, there’s something to be said for a piece of gear that prioritises feel over spectacle. The BassRig Fifteen doesn’t demand attention; it earns it over time, through consistency and musicality.
It’s not the kind of pedal that reveals everything in the first five minutes. Instead, it gradually integrates itself into your playing, shaping your touch and subtly influencing how you approach the instrument.
In the end, that might be its greatest strength.
Because while there are plenty of pedals that can impress, far fewer can disappear into your sound in a way that makes you forget they’re even there.
Available online at Amazon.com
Disclaimer: This pedal was kindly provided by Donner Music for the purpose of this review. However, this does not influence our opinions or the content of our reviews. We strive to provide honest, unbiased, and accurate assessments to ensure that our readers receive truthful and helpful information.
Triple Threat… A compact burst of analog attitude with unexpected appeal for bass players.
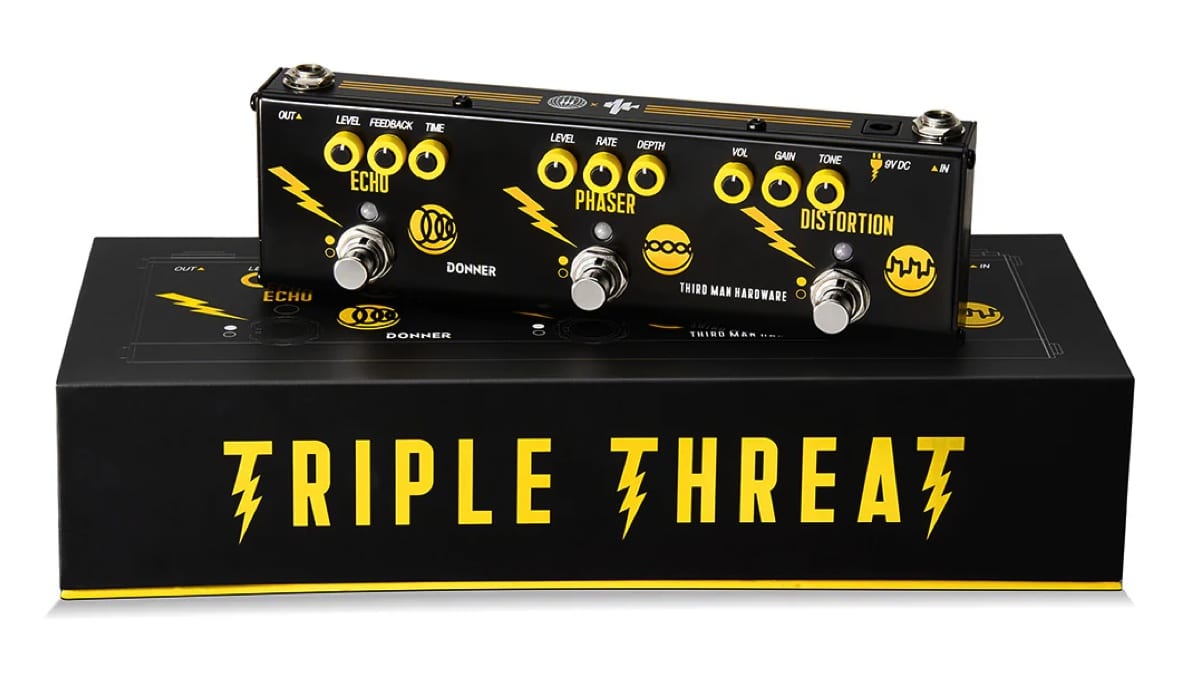
Multi-effects pedals are not usually the first stop for bassists. Most of us build our rigs piece by piece, choosing pedals that preserve low end and offer precise control. The Donner Triple Threat Pedal, created in collaboration with Jack White’s Third Man Hardware, takes a very different approach. It keeps things simple: distortion, phaser, and echo, all in one compact unit, with no menus or deep editing, just knobs and footswitches.
At first glance, it feels like a guitar pedal through and through. But spend a little time with it on bass, and it starts to reveal a different kind of usefulness, less about precision, more about character.
Built around simplicity
The Triple Threat is all about immediacy. Each effect has its own dedicated controls and footswitch, making it easy to dial in sounds quickly without overthinking the process. There’s something refreshing about plugging in and getting straight to experimenting, especially for bass players who are used to more complex signal chains.
The compact enclosure makes it easy to fit onto almost any pedalboard or even use as a standalone unit for rehearsals and smaller gigs. That said, the small size does mean the knobs are quite tight and not the easiest to adjust mid-performance. It’s a minor compromise, but one that becomes noticeable on a dark stage.
Analog character
Rather than aiming for clean, studio-like tones, the Triple Threat leans into a more raw and expressive sound. This becomes particularly apparent in the distortion section. It delivers a gritty, garage-inspired voice that can add real personality to a bass line, especially in indie or lo-fi contexts.
On bass, the key is restraint. Lower gain settings bring out a nice edge without sacrificing too much low end, while higher settings can start to thin things out. Without a blend control, there’s no easy way to bring back the fundamentals once it’s gone, so it rewards a lighter touch.
The phaser is more immediately cooperative. With slower rates and moderate depth, it adds movement without overwhelming the core tone. It’s the kind of effect that works best when you don’t notice it right away, but feel it sitting underneath the groove.
The echo section stands out as the most naturally suited for bass. It’s warm, slightly dark repeats sit comfortably behind the dry signal, adding space without clutter. Whether used subtly or pushed into more ambient territory, it complements the instrument rather than competing with it.
Real-world perspective
The Triple Threat has also found its way onto the pedalboard of Dominic John Davis, bass player for Jack White, which gives some insight into how it functions in a professional setting.
Looking at his broader setup, typically including tools like the Boss TU-3 Chromatic Tuner, MXR M108 Ten Band Graphic EQ, and boutique pedals such as the Mantic Effects Vitriol and Mantic Effects Isaiah Delay, it becomes clear that the Triple Threat isn’t a centerpiece. Instead, it serves as a flexible addition, a way to access a few extra textures without expanding the pedalboard further.
That context is important. For bass players, this isn’t about replacing carefully chosen pedals, but about adding something a little different to the mix.
Versatility in practice
In practical use, the strength of the Triple Threat lies in how quickly it lets you shift between sounds. Having three effects available at your feet without needing multiple pedals can be surprisingly useful, especially in stripped-down setups.
It’s easy to imagine it being used in rehearsals, smaller gigs, or situations where portability matters. It also lends itself well to experimentation, encouraging players to step outside their usual tonal comfort zones.
At the same time, its limitations remain part of the experience. The distortion’s guitar-oriented voicing and the absence of a blend control mean it won’t satisfy players looking for a fully optimized bass overdrive. Instead, it offers something a bit less predictable, and that’s part of its charm.
The Donner Triple Threat Pedal isn’t trying to be a precision tool, and it doesn’t need to be. What it offers is a straightforward, character-driven set of effects that invite exploration.
For bass players willing to approach it on those terms, it can be a surprisingly inspiring addition. It won’t replace a dedicated pedalboard, but it can add texture, movement, and a bit of unpredictability in a way that feels immediate and fun.
For more information, visit online at donnermusic.com